


View
- 안드로이드에서 눈에 보이는 요소
- 개발자가 배치하는 모든 뷰들은 Class로 제공되는데 모두 뷰 라는 클래스를 상속받고 있다
- 뷰 클래스는 모든 UI 요소들의 부모클래스로써 위젯과 레이아웃으로 나뉜다
Layout
- Container, View Group 이라고 부르기도 함
- 다른 뷰들을 포함하고 내부의 뷰를 통합관리하고 내부 븁들이 배치되는 모양을 결정
Widget
- 문자열 입력, 출력 등 어떤 기능을 가지고 있고 사용자와 상호작용 하는 View 들을 통칭하는 말
1. 화면 만들기
- 안드로이드는 화면에 레이아웃을 배치하고 그 안에 다른 레이아웃이나 위젯을 배치해 화면의 모양을 만듦
- 이렇게 만들어진 화면은 모두 객체로 생성되므로 개발자는 이 객체 들을 이용해 코드에서 필요한 작업 가능
2. View 의 주요 속성
- id : xml 이나 코드에서 뷰를 지칭하기 위해 사용
- layout_width : View의 가로 길이
* match_parent : 자기를 가지고 있는(부모의) 레이아웃의 크기에 맞춤
* wrap_content : 자기를 구성할 수 있는 최소 사이즈
- layout_height : View의 세로 길이
* match_parent : 자기를 가지고 있는(부모의) 레이아웃의 크기에 맞춤
* wrap_content : 자기를 구성할 수 있는 최소 사이즈
- layout_margin : View의 외부 여백

- padding : View 의 내부 여백
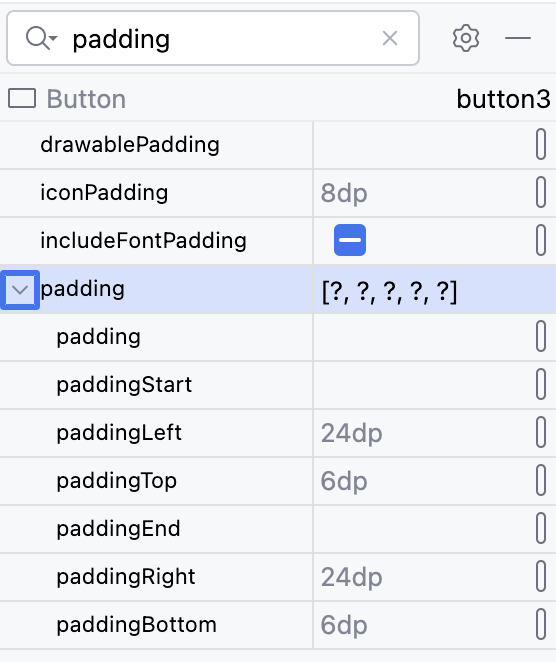
- Background : View의 배경 지정

3. 실습
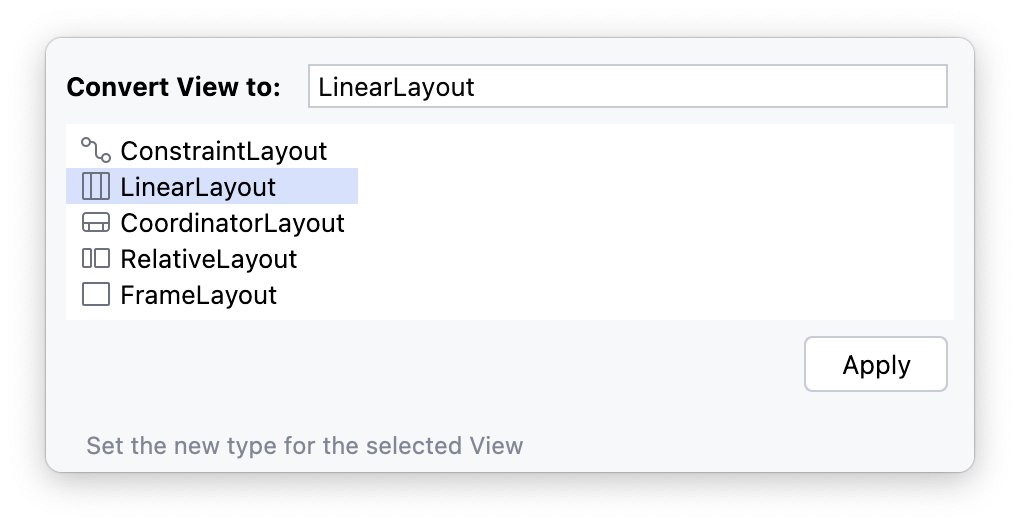
hello world를 지우고 컴포넌트 트리에서 컨버트 뷰를 클릭하면 레이아웃 변경 가능

위 Error는 LinearLayout이 수직인지 수평인지 방향을 지시하지 않아서 생기는 Error로 android:orientation 속성을 추가해주면된다.
변경 전
<LinearLayout xmlns:android="http://schemas.android.com/apk/res/android"
    xmlns:app="http://schemas.android.com/apk/res-auto"
    xmlns:tools="http://schemas.android.com/tools"
    android:id="@+id/main"
    android:layout_width="match_parent"
    android:layout_height="match_parent"
    tools:context=".MainActivity"/>
변경 후
<LinearLayout xmlns:android="http://schemas.android.com/apk/res/android"
    xmlns:app="http://schemas.android.com/apk/res-auto"
    xmlns:tools="http://schemas.android.com/tools"
    android:id="@+id/main"
    android:layout_width="match_parent"
    android:layout_height="match_parent"
    tools:context=".MainActivity"
     android:orientation="horizontal" />
horizontal : 세로 / vertical : 가로

어트리뷰트에서도 변경 가능함.

버튼을 드래그 해 보면 버튼이 위에서부터 아래로 배치되는데 이 버튼들이 전부 위젯이라고 보면 된다.
4. id 를 활용해 버튼을 누르면 텍스트가 변경 되도록 해보기
activity_main.xml
<LinearLayout xmlns:android="http://schemas.android.com/apk/res/android"
    xmlns:app="http://schemas.android.com/apk/res-auto"
    xmlns:tools="http://schemas.android.com/tools"
    android:id="@+id/main"
    android:layout_width="match_parent"
    android:layout_height="match_parent"
    android:orientation="vertical"
    tools:context=".MainActivity">

    <TextView
        android:id="@+id/textView"
        android:layout_width="match_parent"
        android:layout_height="wrap_content"
        android:text="TextView"
        android:textAppearance="@style/TextAppearance.AppCompat.Large" />

    <Button
        android:id="@+id/button"
        android:layout_width="match_parent"
        android:layout_height="wrap_content"
        android:text="Button" />
</LinearLayout>
MainActivity.java
public class MainActivity extends AppCompatActivity {
Button btn1;
TextView text1;
@Override
protected void onCreate(Bundle savedInstanceState) {
super.onCreate(savedInstanceState);
EdgeToEdge.enable(this);
setContentView(R.layout.activity_main);
//생성된 뷰의 주소값을 가져온다
btn1 = findViewById(R.id.button);
text1 = findViewById(R.id.textView);
ViewCompat.setOnApplyWindowInsetsListener(findViewById(R.id.main), (v, insets) -> {
Insets systemBars = insets.getInsets(WindowInsetsCompat.Type.systemBars());
v.setPadding(systemBars.left, systemBars.top, systemBars.right, systemBars.bottom);
return insets;
});
}
// 버튼을 누르면 동작할 것
class BtnListener implements View.OnClickListener {
@Override
public void onClick(View v) {
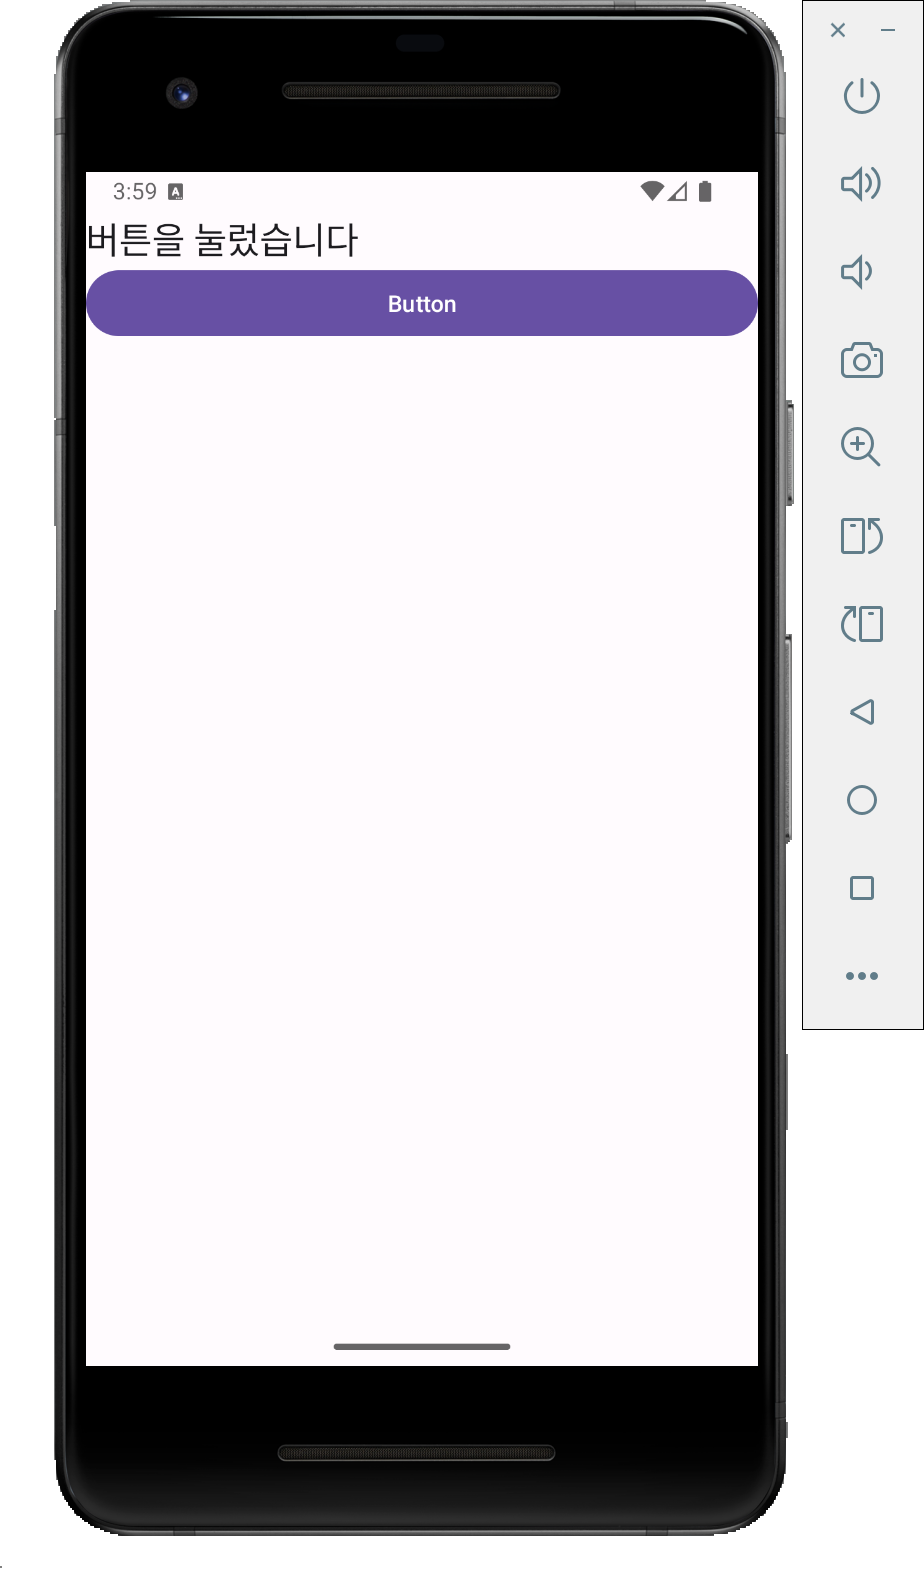
text1.setText("버튼을 눌렀습니다");
}
}
}

'안드로이드 스튜디오' 카테고리의 다른 글
| [Android] LinearLayout (0) | 2025.06.07 |
|---|---|
| [Android] ViewBinding (1) | 2025.06.07 |
| [Android] 동작원리 (0) | 2025.06.06 |
| [Android] 프로젝트 생성 및 AVD 테스트 (1) | 2025.06.06 |
| [Android] 안드로이드 개발환경 구축 (0) | 2025.05.30 |